Tuesday, November 30, 2010

MONSTER BOOK

Send your Monster info to kni07001@byui.edu. (You can add or take away from the info list if you want.) Also sketch out ideas for the info page frame.

Origami Book Video Replacement

Kris Nielson

For lack of a better video, camera or working combination of the two, here is 'a' link to the origami book.
http://www.youtube.com/watch?v=dXLhjYgMZ68

Tuesday, November 23, 2010

Monster Book 3:15 Book Arts!!

Here are just a few things that you might need to know as of now, if you have anything else to add, please make your comments on here!! :)

Due Dates:

Tuesday Nov. 30 - Illustration of Monster,
Information to put in your Monster's Profile,
Group leaders have an idea of where and when your group will all meet.
Thursday Dec. 2 - Work day in class! Everyone will work in your groups to help get things
done, if working out of class make sure to
Tuesday Dec. 7 - Everyone will start assembling their book covers,
Mock up book of the completed text pages??
Thurs. Dec. 10 - Work Day

Tuesday Dec. 13 - Book Due!!!!

Profile Info:

Name:
Age:
Height:
Weight:
Diet:
Habitat:
Occupation:
Biggest Fear:
Hobbies:
Interests:
Description:

These are just ones we thought of so far, if you can think of anything else fun to put in their profile feel free to add it here!

We also need a title for the book, so any ideas place them here please!!

Images:
You need a actual copy of your monster to turn in on tuesday.
If submitting it through e-mail, make sure to save it as a jpg or pdf!

Friday, November 19, 2010

Angela Stone and the 7-Layered Chinese Star Book!!!

Hello pupils!
Today you're going to get the pleasure of learning how to design and make your own 7-layered chinese star book!

Supplies:

2 pieces of chip board (or book board) cut at the same size
2 pieces of paper about 1/2 in to 3/4 in larger than end covers
7 signatures
3 folios for each signiture
(21 pieces total)
ruler
needle
thread
glue
exacto knife (or scissors)
ribbon/rope

Instructions:
Here are a few instructions and videos I found online that can help you to create your own favorite Chinese Star Book:

http://twodressesstudio.blogspot.com/2009/08/seven-layered-chinese-star-book.html

The last one is the one I followed just with the pictures but there are many different ways to design your own! Go crazy!!

Coat Hanger Book

This book is a similar to a regular coil-bound book, except instead of a thin plastic coil, a thick metal coat hanger is used for the binding in its place.

Steps: 1) find a metal coat hanger or similar thick piece of wire that can be bent without breaking but that isn't too bendy
2) Using a straight piece of the hanger, wrap it around a cylindrical object to get a nice uniform coil. You will end up with something that looks like a spring.
3) practice winding this coil through a spare piece of paper to find out exactly where the holes will be, then use the piece of paper as a template to poke holes in the cover and through the signatures
4) Wind the coiled coat hanger through the book and twist each end of the coil to keep it in place

This method is really bulky and pretty manly. It works best if the pages are very thick (such as thick cardboard/chipboard etc.) It gives a nice industrial look to the book which is especially masculine-a far stretch for the novice scrapbooker.

Jen Wilkes Hemp Leaf Binding


Make sure the covers and pages are aligned and use the awl to punch the holes. After punching the holes, the book can be stitched. The amount of thread needed is approximately seven times the height of the book. When in doubt, cut the thread long. While stitching, take care not to rip the holes, but pull the thread as tight as possible. Too much give in the binding will leave the pages unsupported.
I did the book with the four holes punched three quarters of an inch and five holes punched three eighths of an inch from the spine. The back cover is on top and the spine in the front.

Step 1: Push the needle up through the spine through the pages near the back of the book and through the inner right hole in the row farther from the spine. Loop the needle and thread around the spine and back to the inner right hole. Leave a small tail inside the book to be used later to tie the knot.
Step 2: Push the needle up through the inner right hole in the row farther from the spine and down through the inner left hole in the same row.
Step 3: Loop the needle and thread around the spine and back down through the inner left hole.
Step 4: Push the needle up through the outer left hole in the row farther from the spine. Loop the needle and thread around the spine and back up through the outer left hole.
Step 5: Loop the needle and thread around the bottom of the book and back up through the outer left hole.
Step 6: Push the needle down through the left hole in the row closest to the spine.
Step 7: Loop the needle and thread around the spine and back down through the left hole.
Step 8: Loop the needle and thread around the bottom of the book and back down through the left hole.
Step 9: Push the needle up through the outer left hole in the row farther from the spine and down through the inner left hole in the same row.
Step 10: Push the needle up through the inner right hole in the row farther from the spine and down through the outer right hole.
Step 11: Loop the needle and thread around the spine and back down through the outer right hole.
Step 12: Loop the needle and thread around the top of the book and back down through the outer right hole.
Step 13: Push the needle up through the right hole in the row closer to the spine.
Step 14: Loop the needle and thread around the spine and back up through the right hole. Then, loop the needle and thread around the top of the book and back down through the right hole.
Step 15: Push the needle down through the outer right hole in the row farther from the spine and up through the inner right hole in the same row.
Step 16: Push the needle up through the inner right hole in the row farther from the spine and down through the middle right hole in the row closer to the spine.
Step 17: Loop the needle and thread around the spine and back down through the middle right hole.
Step 18: Push the needle up through the outer right hole in the row farther from the spine and down through the middle right hole in the row closer to the spine.
Step 19: Push the needle up through the inner right hole in the row farthest from the spine and down through the center hole in the row closer to the spine.
Step 20: Loop the needle and thread around the spine and back down through the center hole.
Step 21: Push the needle up through the inner left hole in the row farther from the spine and down through the middle left hole in the row closer to the spine.
Step 22: Loop the needle and thread around the spine and back down through the middle left hole.
Step 23: Push the needle up through the outer left hole in the row farther from the spine and down through the middle left hole in the row closer to the spine.
Step 24: Push the needle up through the inner left hole in the row farther from the spine and down through the center hole in the row closer to the spine. Then, push the needle up through the inner right hole in the row farther from the spine.
Step 25: Use the needle to tie a knot with the remaining thread and the tail left earlier. Pull the knot into the book through the inner right hole and trim off excess thread.

Thursday, November 18, 2010

Book Arts 11 o'clock Collaborative Project

Alphabet Animal List:
Alligator
Beaver
Camel
Duck
Elephant
Flamingo
Giraffe
Hippo
Iguana
Jelly Fish
Koala
Llama
Moose
Narwhale
Owl
Platypus
Quail
Rattle Snake
Snail
Tiger
Unicorn
Vulture
Walrus
X-Ray
Yak
Zebra

Animal/Illustration Assignments:
Karesa: Alligator, Beaver, and Duck
Nelson: Camel, Vulture, Walrus
Norma: Elephant Flamingo, Giraffe, and Hippo
Leila: Iguana, Jelly Fish Koala, Llama, and X-Ray (Penguin)
Justine: Moose, Narwhale, Owl, and Platypus
Amy: Quail, Rattle Snake, Snail, and Tiger
Melissa: Unicorn
Trista: Yak and Zebra

Contact Project Man: David Palmer 206.919.4362 pal03006@byui.edu

Accordion Book-Amy Tidwell

I am going to do a different structure of the accordion book. I really like the accordion family; they can be designed and altered to be both functional and beautiful. I hope that you find my demo interesting and you want to try some accordion books for yourselves! This is a link clear, simple instructions for a basic accordion book: http://www.youtube.com/watch?v=yaES5tk3M7M

The Orihon: This is the structure that I am going to show, and some history about it.

Orihon
The orihon structure was developed during the Heian period (794–1185), and was traditionally used for Buddhist sutras. It is thought that if an orihon book inscribed with Buddhist sutras is 'cascaded' from hand-to-hand, the draught created by the falling pages has healing properties if directed to the affected part of the sufferer's body. In Japanese Buddhist monasteries it is still sometimes possible to receive this treatment.

The orihon structure developed out of the scroll simply by folding the scroll into an accordion-fold and pasting it between covers. In this form it was both easier to access and to store and, although not yet truly a 'book-shaped' book this was the vital step in its development. Structure The basic orihon book consists simply of an accordion-folded sheet of paper bound within soft or hard covers. The paper can be a single long strip, or several smaller strips pasted together. Traditionally, smaller sheets would be pasted into a long strip with little regard paid to where the joins fell; as the style developed, however, the joins were usually planned to fall at the page folds.

If the flaps all fall at the same (usually fore-) edge, the book will have greater thickness one side than the other; for this reason if there are to be a great number of joins they are sometimes placed at the back- and fore-edges alternately, even though the back-edge joins are more visible than the fore-edge joins. If an even number of pages is used, the book will have a definite 'front' and 'back'; if an odd number of pages is used, the concepts of 'frontness' and 'backness' may be more equivocal – either doubling the capacity of the book, or enabling a double book not dissimilar to the Western dos-à-dos structure.

There may be no endpapers; the main pages may be attached to the covers by means of a narrow tab which is overlaid with a single sheet of decorative paper; or an extra page-pair of a decorative paper may be used.

Applications
A common use in the West is in children's books; room friezes are often packaged orihon-fashion, and some board books are constructed in orihon form, occasionally with integral covers (see Children's Board Book, right). The form is also frequently used in advertising leaflets which, although consisting of no more than a single sheet of folded paper, might properly be considered orihon books (seeAdvertising Leaflet, right).

The book artist may find the orihon indispensable for two or three of its characteristics:
• while it is possible to read each page or pair of pages individually, it is also possible to view all the pages at once, or in non-contiguous groups.


This is a very useful attribute in the case of panoramic pictures, time-line diagrams, and some records of performance and conceptual art, for example, Horizon to Horizon and Alps Horizon by Hamish Fulton; the all-at-one-view property is exploited in various books by Sarah Jackson. In England orihon-form maps, showing the route between only two towns – stylised but showing landmarks and road junctions – were known as 'stagecoach maps'. (See The Northern Line, flat, right,for a modern equivalent of the stagecoach map by the author.)
• because of their compound action, orihon books can be very useful as scrapbooks. Guarding of the pages is unnecessary – however thick the scraps in the book, so long as they are not too close to the folds, the book will simply expand uniformly (see Scrapbook, right).
• Sometimes the orihon is used for no apparent reason other than that it is attractive and unusual. Perhaps it is for no deeper reason than this that it is used for such books as Tony Hayward's Indian Sandwich series, 1994, right.
• When opened, the orihon book can assume a very sculptural form (see The Northern Line, fanned, right).

((http://homepages.nildram.co.uk/~dawe5/bookbinding_pages/BB_accordion2.html))

Tuesday, November 16, 2010

The amazing children's board book- Emily Haralson

Step 1: cut SIX 5in x 5 in boards out of chip board (or cereal boxes) Cut TWO 5x5 boards out of book board.

Step 2: write and illustrate a simple children's book on five 6 x 6 papers. Make sure to mark where the pages will meat the board

Step 3: Glue papers onto chipboard

Step 4: Glue boards together back to back. If you use cereal boxes sand paper them first so that they will stick when glued.The two end boards will be left.

Step 5: Curve edges on text block and book boards.

Step 6: Measure width of text block at the spine. cut out a spine then glue it to book cloth. Glue down the book boards leaving 1/8 of an inch between it and the spine.

Step 7: Glue down paper on the book board from where the book cloth leaves off.

step 8: Glue down chip board end boards down to the book board.

Step 9: Read to someone you love. Enjoy your children's book board.

Paper Sack book

To Make the Paper sack book you will need to buy the paper sacks from a local grocer store.
After that you will fold the paper sacks in half and mix up the ends as you put it together so that you have a pocket every other page.
then you decide what type of a book you want to make with it and start putting it together.this is with out something in the pockets

this is with something in the pockets
Enjoy.

Emily Perkes


Use brown lunch sacks as paper and your possibilities are endless!


The Account Book (Japanese Binding)
Kali Koscinski


Things you will need
3 signatures (with 5 or more folios)
2 cover sheets the same size as the signatures
2 long strands of hemp or string (thicker is better)
book glue

First you want to glue the head of the cover sheet to the folded edge of the first folio. Do the same with the back cover sheet to the end signature. The middle will not be glued to anything.

Next you want to put it all together, the front, middle and back. Mark on the head two places for holes making sure they 1/3 of the width. Next make the holes through all the signatures and covers.

Take to hemp and down one of the holes, (step 1) around the side (step 2) and back through the same hole. (step 3) Make sure the ends of the hemp are on opposite sides. Tie the two hemp ends over the spine.

Do the same thing to the other side.

Take the two tied hemp ends and tie them tightly together at the center of the spine.
Trim the hemp ends to desired length and knot the ends of each hemp

There is your Japanese Account book.

Caterpillar Stitch - Mike Commons


Monday, November 15, 2010

Magic Wallet - Makayla Summers


Here is a fancy way of making a simple
wallet tohold cash as well as credit cards.


First you start by making an inner and outer shell. The outer shell is approximately 3x4 inches (you may very this depending on the desired size). The inner shell is 1/8 in smaller that your outer shell. Note: you are going to want thicker board for you outer shell than your inner shell. Suggestion: book board for the outer shell and chip board for the inner shell.

Then cover the inner and outer shell with
desiredbook clothe, paper, leather, etc.

Next you are going to need thin elastic band. You are going to want to cut this band according to the larger side of you desired size (example: 3x4 inches - cut your elastic 4 inches, 5x7 inches - cut your elastic 7 inches).

No this is the tricky part. Here is a link as to how to do the innards of the wallet. This is made from duct tape but it is the same concept with your elastic. You are going to want to apply these to the inner shell of the wallet (your outer shell will not be used until the very end).


Now that you have the innards of the wallet glued to the chip board, we are now going to apply the inner shell to the outer shell. Simply glue the back of the chip board (inner shell) to the back of the outer shell making sure that you have them aligned. Then, it works best if you can let the wallet sit in a book press for some time so that it creates a nice, solid form.

And there you have it! The magic wallet - go impress some peeps!

cd holder - kelsie christensen


i found (how to make) this cd holder while searching for my demo and thought it was the perfect thing for us photographers to learn how to do!

what better way to give your photography client their pictures then in this cool little case! (if you're giving them the disc.....)

supplies:
-2 boards 6X6 in (i used mat but you should prob use book board)
-fabric/bookcloth/or paper
-Glue
-Paper and Photo for inside
-CD holder or button
-Other Bookbinding supplies

Steps:
1- Cut2 book boards 6X6
2- Make your cover leaving 1/2 in. between boards
3- glue ribbon on into bookboards
4- cover the inside with one long piece of paper.
5- glue on CD holder
6-glue on picture!
7-press so it doesn't go crazy and bend all weird.
8-put cd in and give to client!

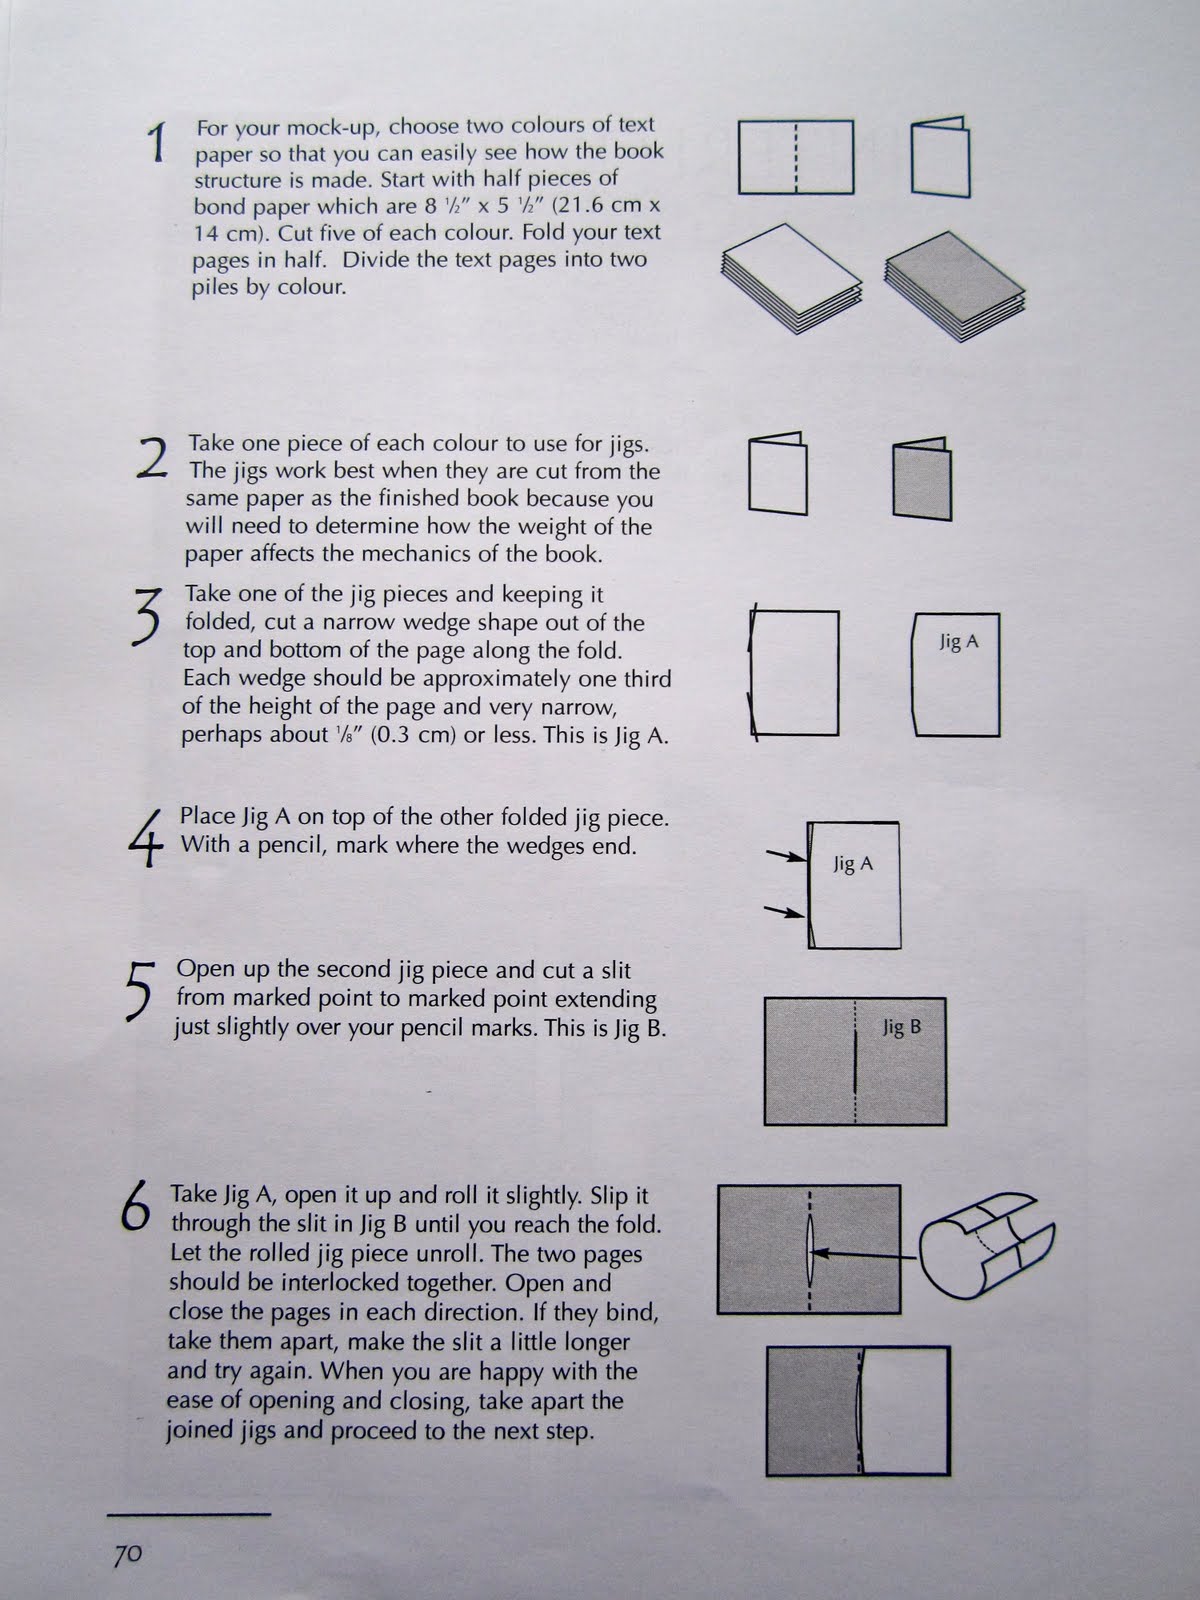
Slit and Slot Book (Interlocking Signatures)-Mikaela Pronk


This book is great because it requires no needle, thread, or glue.
The steps come from the book, "Books With Girth" By Cherry Moote.
Click steps to see larger.

Jacob's Ladder by Karesa Nelson

Jacob's Ladder

Materials Used:

-10 pieces of book board cut in all the same size. (You can use more as long as you have an even number and longer ribbons.)
-Some scrapbook paper to cover the book board
-A good length of ribbon, preferably thin.

1. Cover the board pieces with the patterned scrapbook paper on one side only. You can put anything on the outside pieces, but remember the ribbons will obscure parts of the board, which is why it's best to use thin ribbon.

2. Make two equal piles with your finished squares, making sure all of them are right side up. Turn one pile over, so the board is face down.

3. Take all the squares in the pile you've turned over and mark three lines evenly from top to bottom.

4. Take the first marked square and run a little glue down the lines. Lay the ribbons down with the two outside ribbons running out from the top, and the center ribbon running down from the bottom.

5. Take square number 2 which is unmarked and spread glue all over the undecorated side. Glue it down on top of the marked square. Let it dry a bit.

6. Then reverse the direction of the ribbons so the top two ribbons come down to the bottom and the bottom ribbon lies up to the top and make sure the ribbons are lying flat.

7. Take square number 3 which is marked and place (without glue) face down on top of the other two. Then on its back side put a little glue or tape down the lines and reversing the directions of the ribbons, lay them on top.

8. Taking another unmarked square spread it with glue and lay down on top of the previous square. Bring the ribbons over once more, reversing their direction.

9. Repeat the directions from step number 4 through to the last unmarked square which is glued on top. Trim off the excess ribbon.

10. Your Jacob's ladder may be a little stiff at first, but the more it is used, the better it will get.